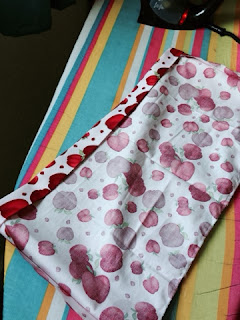
You will need: one fat quarter, 1/2" elastic, scissors, thread, an iron, a sewing machine.
 |
| Baby skirt for 12-18 months, from a fat quarter |
 |
| 2 pieces, both 18" x 11" |
 |
Step 3: Sew along the two short sides. If you have an overlocker, you can use this, but otherwise, a sewing machine will give you a crisp finish.
 |
| I use my trusty Singer sewing machine |
Step 4: To make sure your skirt is straight and neat, now is the time to do some pressing! I am always so tempted to skip this part, and get on to the sewing sooner, but it really does make a difference to how the skirt looks at the end, and pressing at this point makes the sewing easier later.
Press the seams on the short sides you have sewn. This makes them lie flatter once you sew the hem and the waistband.
 |
| Press the seams on the short sides you have sewn |
 |
| Hem pressing |
 |
| Hem and waistband pressed! |
Step 5: Sew along the hem and the waistband. See how much easier it is to sew in a straight line when you have spent the time pressing? Important... leave a teeny gap when sewing the waistband, so you can thread the elastic through. I forgot about this, and had to unpick a little (see photo below.)
 |
| Sewing the waistband |
This is what your skirt should look like so far...
 |
| Hem and waistband sewn |
 |
| Beware... this is what happens when you forget to leave a gap for the elastic! I had to unpick a little bit. |
Step 6: Measure your elastic. How big you make this will depend on the size of your little one's waist. I tend to use the following measurements:
Newborn: 16" elastic, 15" when sewn
0-3 months: 16.5" elastic, 15.5" when sewn
3-6 months: 17" elastic, 16" when sewn
6-12 months: 18" elastic, 17" when sewn
12-18 months: 19" elastic, 18" when sewn
18-24 months: 20" elastic, 19" when sewn
If you are making for your own baby, another way to do it is to roughly measure his/ her waist and deduct around 1".
Thread the elastic through the casing. Attach a safety pin to one end, and this will help you to guide it through.
Step 7: As you pull the elastic through on the safety pin, the fabric will gather up and you will see the skirt taking shape. Yay! Make sure you keep a firm hold on the other end of the elastic.
Please follow Make Thrift Love Life on Bloglovin'
https://www.bloglovin.com/blog/11924471
 |
| Elastic and safety pin |
Step 7: As you pull the elastic through on the safety pin, the fabric will gather up and you will see the skirt taking shape. Yay! Make sure you keep a firm hold on the other end of the elastic.
 |
| Skirt taking shape |
 |
| Joining the elastic |
Step 8: Join the elastic together. Overlap the ends by about 1/2" each side, and hand-sew securely together. Once you have done this, hand-sew the tiny gap you left in the waistband and... ta-dah! your skirt is complete!
Pictures of my daughter modelling her skirt can be found here!
 |
| The finished skirt |
https://www.bloglovin.com/blog/11924471
Hi Gayle, thanks for calling by the blog and leaving the link to yours. Love your skirt, and am amazed you can cut it out of a fat quart xx Clare
ReplyDeleteWhat a lovely design, and it's all homemade!
ReplyDeleteSharlotte | UK Beauty Blog
Thank you for your lovely comments! It's one of my favourite projects, as the skirts are one-of-a-kind, they are easy, they leave no waste and they are cost effective!
ReplyDeleteThank you for linking up to Accidentally Wonderful Wednesday!
ReplyDeletehttp://www.accidentallywonderful.blogspot.com/2014/03/accidentally-wonderful-wednesday-8.html
What a lovely design :)
ReplyDeleteThanks again for the Accidentally Wonderful party- great fun! Neviana, much appreciated. If you have a second, please pop across to Bloglovin' and follow me there... Merci!
ReplyDeleteGreat skirt...looks fab!
ReplyDeleteThank you Janice- these skirts are addictive, Heather has loads of them now! People always comment on them as they are different from what's normally out there, and you can choose really funky fabrics.
ReplyDeleteAww. I got mine a sewing machine from my in-law but its not working =(
ReplyDeleteYOur post is so cool! I have always wanted to sew.
#PinItParty
pinned
Oh no Pixiedusk! I've seen sewing machines pretty cheap in places like Lidl and in supermarkets- have a look online. This kind of project is a good beginner one is it's just a few straight lines. Good luck!
ReplyDeleteYou did a lovely job on this tutorial Gayle! I love the fact that you used exactly a fat quarter for this project! That makes it so convenient!
ReplyDeleteWould love for you to stop by tomorrow and link this up to Fabric Frenzy Friday!
-Lindsey
Fabric Frenzy Friday
too too cute, love it
ReplyDeleteooo such a cute idea.
ReplyDelete